RESTful APIs are a key component of modern web and mobile applications, providing a standardized way for different systems to communicate. Python, with its lightweight Flask framework, is a popular choice for building RESTful APIs due to its simplicity and flexibility.
In this guide, we will walk through the steps to build a basic RESTful API using Python and Flask.
1. What is a RESTful API?
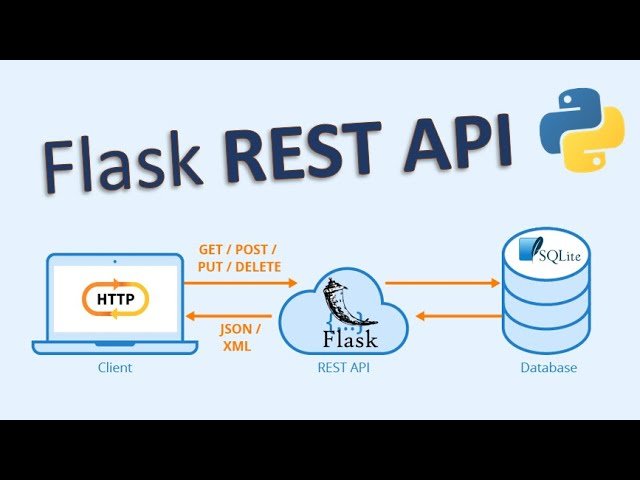
A RESTful API (Representational State Transfer) is an architectural style for designing networked applications. It relies on standard HTTP methods (GET, POST, PUT, DELETE) to allow communication between a client (e.g., web or mobile app) and a server. RESTful APIs use JSON or XML formats to exchange data.
Key Characteristics of RESTful APIs:
- Stateless: Each request from the client to the server must contain all the information needed to understand the request.
- Resource-based: APIs are built around resources (e.g., users, products), identified by URLs (e.g.,
/users/or/products/). - HTTP Methods: The API uses standard HTTP methods to perform operations on resources:
- GET: Retrieve data.
- POST: Create new resources.
- PUT: Update existing resources.
- DELETE: Remove resources.
2. Why Use Flask to Build RESTful APIs?
Flask is a lightweight micro-framework for Python that is ideal for building APIs. It is minimalistic, meaning you can quickly set up an API without too much overhead, yet it is highly extensible.
Key Benefits of Flask:
- Simplicity: Flask’s minimalistic nature makes it easy to learn and use for small to medium-sized applications.
- Flexibility: You can add libraries or middleware as needed, keeping the app lightweight.
- Extensibility: Flask supports extensions to add extra functionality like authentication, databases, and more.
3. Setting Up Your Environment
To start building a RESTful API with Flask, you’ll need Python installed on your machine. Follow these steps to set up the environment:
3.1 Install Python and Pip
Make sure Python is installed by running:
python --versionIf not installed, you can download it from python.org.
Ensure pip (Python’s package manager) is installed by running:
pip --version3.2 Install Flask
Once Python is set up, you can install Flask using pip:
pip install Flask3.3 Setting Up the Project
Create a new directory for your project:
mkdir flask_rest_api
cd flask_rest_api
Create a virtual environment to manage your project’s dependencies:
python -m venv venv
source venv/bin/activate  # On Windows use: venv\Scripts\activate
Now install Flask within your virtual environment:
pip install Flask4. Creating a Basic RESTful API
Let’s create a basic API with endpoints for common CRUD (Create, Read, Update, Delete) operations using Flask.
4.1 Create the Flask App
Create a file called app.py and add the following code to set up a basic Flask app:
from flask import Flask, jsonify, request

app = Flask(__name__)

# Sample data
users = [
    {'id': 1, 'name': 'John Doe', 'email': 'john@example.com'},
    {'id': 2, 'name': 'Jane Smith', 'email': 'jane@example.com'}
]

# Test route
@app.route('/')
def hello_world():
    return 'Welcome to the RESTful API!'

if __name__ == '__main__':
    app.run(debug=True)
Run the app:
python app.pyNavigate to http://127.0.0.1:5000/ in your browser, and you should see the message “Welcome to the RESTful API!”
4.2 Building the CRUD Endpoints
Let’s now create endpoints for CRUD operations on the users resource.
GET: Fetch All Users
This endpoint will return the list of users.
@app.route('/users', methods=['GET'])
def get_users():
    return jsonify({'users': users})
GET: Fetch a Single User by ID
This endpoint will return a single user based on the user ID.
@app.route('/users/<int:user_id>', methods=['GET'])
def get_user(user_id):
    user = next((user for user in users if user['id'] == user_id), None)
    if user:
        return jsonify(user)
    else:
        return jsonify({'message': 'User not found'}), 404
POST: Create a New User
This endpoint will create a new user.
@app.route('/users', methods=['POST'])
def create_user():
    new_user = {
        'id': len(users) + 1,
        'name': request.json['name'],
        'email': request.json['email']
    }
    users.append(new_user)
    return jsonify(new_user), 201
PUT: Update a User
This endpoint will update an existing user based on the user ID.
@app.route('/users/<int:user_id>', methods=['PUT'])
def update_user(user_id):
    user = next((user for user in users if user['id'] == user_id), None)
    if user:
        user['name'] = request.json['name']
        user['email'] = request.json['email']
        return jsonify(user)
    else:
        return jsonify({'message': 'User not found'}), 404
DELETE: Delete a User
This endpoint will delete a user based on the user ID.
@app.route('/users/<int:user_id>', methods=['DELETE'])
def delete_user(user_id):
    global users
    users = [user for user in users if user['id'] != user_id]
    return jsonify({'message': 'User deleted'})
5. Running the API
Save the app.py file, and run the application:
python app.pyYou now have a fully functional RESTful API! You can test your API using tools like Postman or cURL.
Example Requests:
- GET all users:
GET http://127.0.0.1:5000/users- GET a user by ID:
GET http://127.0.0.1:5000/users/1- Create a new user:
  POST http://127.0.0.1:5000/users
Body: { "name": "Alice", "email": "alice@example.com" }- Update a user:
  PUT http://127.0.0.1:5000/users/1
Body: { "name": "John Updated", "email": "johnnew@example.com" }- Delete a user:
DELETE http://127.0.0.1:5000/users/16. Best Practices for RESTful APIs
When developing RESTful APIs, keep the following best practices in mind:
- Use HTTP Status Codes: Return appropriate status codes (e.g., 200 for success, 404 for not found, 201 for created).
- Version Your API: Use URL versioning (e.g.,
/api/v1/users) to ensure backward compatibility. - Handle Errors Gracefully: Provide meaningful error messages and handle exceptions properly.
- Use JSON: JSON is the preferred format for exchanging data between the client and server.
- Implement Authentication: Use OAuth2 or token-based authentication for secure access to resources.
- Paginate Large Responses: For large datasets, implement pagination to reduce load times and server stress.
7. Conclusion
Building a RESTful API with Flask is straightforward and efficient. With the ability to handle CRUD operations and support scalable designs, Flask is a powerful framework for web developers looking to build REST APIs.
At TechsterTech.com, we specialize in building robust APIs and backend systems tailored to your business needs. Contact us today for expert API development services.