Google Tag Manager (GTM) is a powerful tool that allows web developers and marketers to easily manage and deploy marketing tags (snippets of code or tracking pixels) on a website or mobile app without having to modify the core code. GTM simplifies the process of adding, managing, and testing analytics, remarketing, and other tracking tags.
In this blog post, we’ll discuss what Google Tag Manager is, how it works, and how to integrate it into your web development workflow.
What is Google Tag Manager?
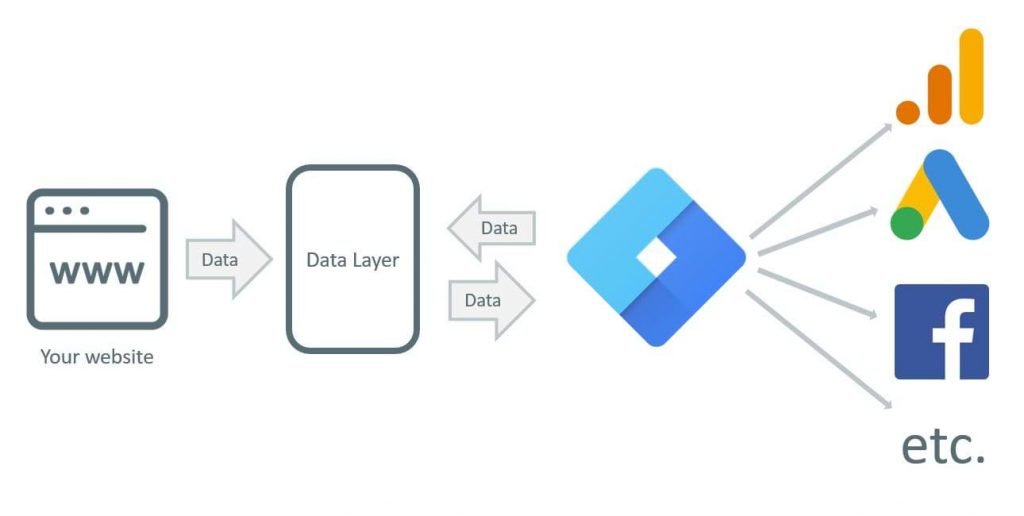
Google Tag Manager is a free tag management system that enables you to add and update your website tags quickly without editing the site’s code. Tags are snippets of JavaScript or HTML code that send data from your website to third-party services like Google Analytics, Facebook Ads, or other tracking platforms.
By using GTM, you can streamline the process of managing multiple tags, reducing errors, and allowing your marketing team to make changes without needing a developer.
Benefits of Using Google Tag Manager in Web Development
- Easy Tag Management: GTM allows developers and marketers to manage all tags from a single interface without manually changing the codebase.
- Improved Website Performance: GTM loads asynchronously, which means it doesn’t slow down the page load time. It can also help in optimizing tags for better performance.
- Centralized Control: With GTM, you have centralized control over all your marketing and tracking tags, making it easier to manage and organize them.
- Error Reduction: GTM provides a preview and debug mode that allows you to test and troubleshoot your tags before they go live, reducing the chance of errors.
- Faster Deployment: Since GTM doesn’t require any coding changes to the website, tags can be added or removed quickly, helping teams respond faster to new marketing needs.
Steps to Set Up Google Tag Manager
Step 1: Create a Google Tag Manager Account
To get started, you’ll need a Google account. Follow these steps:
- Go to the Google Tag Manager website and sign in.
- Create a new account by filling in your company’s name, country, and the container (usually the name of the website).
- Select the target platform (Web, iOS, Android, AMP) and click “Create.”
Step 2: Add Google Tag Manager to Your Website
Once you’ve created your account and container, GTM will generate a code snippet that you need to add to your website.
- Copy the Code Snippet: After creating the container, you’ll be provided with two pieces of code.
- The first snippet should be placed in the
<head>section of your website. - The second snippet should go immediately after the opening
<body>tag.
- Add to Your Website:
- If you’re using a CMS like WordPress, you can add the code directly to your theme’s header and body sections.
- For custom-built websites, the code should be added to the HTML files of your website.
Step 3: Configure Tags
Once GTM is installed on your site, you can start adding and configuring tags. Tags are the actual tracking snippets that you want to add to your site. Common tags include Google Analytics, Google Ads, Facebook Pixel, and others.
- Create a Tag:
- Go to your GTM dashboard, click “Add a new tag,” and name it.
- Select the tag type (e.g., Google Analytics or a Custom HTML tag).
- Configure the tag by adding the necessary ID or code snippet.
- Set Triggers:
- Triggers define when and where a tag should be fired. You can choose specific pages, clicks, or events as triggers.
- For example, if you want a Google Analytics page view tag to fire on every page, you would select the “Page View” trigger.
- Save and Publish:
- Once the tag and trigger are set up, save your changes and publish the container to make the tag live.
Step 4: Use Variables for Dynamic Tracking
Variables in GTM allow you to create dynamic values for your tags. For instance, if you’re setting up a tag to track form submissions, you can use variables to capture the form ID, URL, or any other relevant information.
- Go to the Variables Section:
- In your GTM dashboard, go to the “Variables” section and create a new variable.
- Choose Variable Type:
- GTM offers built-in variables (e.g., page URL, referrer, click classes) and user-defined variables.
- For advanced implementations, you can use JavaScript variables, data layer variables, and more.
- Use the Variable in Tags:
- Once the variable is set up, you can use it in your tags for more advanced tracking.
Step 5: Preview and Debug
Before publishing your tags live, use the preview mode in GTM to ensure they are working as expected.
- Click “Preview”: In the GTM dashboard, click the “Preview” button.
- Test the Website: Open your website in a new tab. A debug panel will appear at the bottom, showing which tags are firing and which aren’t.
- Troubleshoot: If any tag isn’t working as expected, use the debug panel to identify issues and fix them.
Step 6: Publish Your Container
Once you’re satisfied that everything is working, click “Submit” in the GTM dashboard to publish your container. This will make all of your tags live on the website.
Best Practices for Using Google Tag Manager
- Organize Tags and Triggers: Keep your tags, triggers, and variables well-organized with clear names. This helps in managing and scaling your GTM setup as your website grows.
- Leverage the Data Layer: The data layer is a JavaScript object that holds information you can pass between your website and GTM. It allows for more advanced and dynamic tracking setups.
- Use Built-in Tags: GTM offers built-in templates for common tags like Google Analytics, Facebook Pixel, and others. Whenever possible, use these templates as they are easier to configure and maintain.
- Test Frequently: Always use the preview and debug modes to test tags before publishing. This reduces the chance of incorrect tracking.
- Version Control: GTM automatically saves versions of your containers. Keep track of different versions and ensure you’re documenting any changes for easier management.
Conclusion
Google Tag Manager is an essential tool for developers and marketers looking to streamline the process of implementing and managing tracking codes. By integrating GTM into your web development projects, you can easily manage various analytics and marketing tags without constantly modifying the code.
At Techstertech.com, we specialize in web development and digital solutions, including seamless integration of tools like Google Tag Manager to optimize performance, tracking, and analytics. Reach out to us if you need help setting up or managing GTM in your web projects.