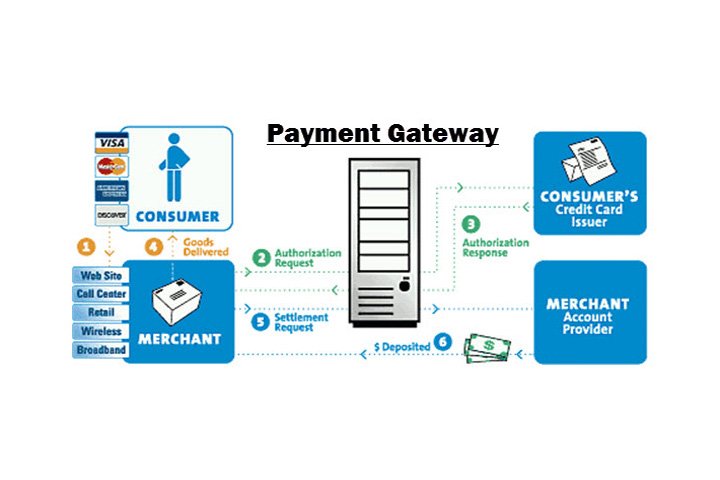
Integrating a payment gateway is crucial for any business that processes online transactions, as it ensures secure and seamless payments for customers. A payment gateway serves as the intermediary between a customer and a merchant, facilitating secure data transmission for payment processing. Here’s a step-by-step guide on how to integrate payment gateways on a website:
1. Choose the Right Payment Gateway
- The first step is selecting the most appropriate payment gateway for your website. Popular options include PayPal, Stripe, Razorpay, and Authorize.Net. When selecting, consider transaction fees, currency support, and security features.
- Check if the gateway is compatible with your website platform, whether you are using WordPress, Shopify, or a custom-built site.
2. Set Up an Account with the Payment Gateway Provider
- Sign up with the selected payment gateway provider. Complete the verification and documentation process, which may involve providing business details, banking information, and other relevant documents.
3. Obtain API Keys
- Payment gateways typically provide API keys (usually a public and secret key) that you need to integrate into your website. These keys are used to authenticate and secure transactions.
- Ensure these keys are stored securely, as they are critical to payment security.
4. Install Payment Gateway Plugin or SDK
- If your website runs on a CMS like WordPress, you can install plugins for popular payment gateways. For custom sites, you may need to use the SDK provided by the payment gateway.
- Examples of plugins include WooCommerce Payment Gateways for WordPress or Shopify Payment Plugins.
5. Integration via API
- For custom websites, you’ll need to integrate the payment gateway by utilizing the API provided by the service. This involves coding the backend to process payment requests, handle responses, and redirect users upon successful or failed payments.
- Most payment gateway APIs provide comprehensive documentation to guide developers through the integration process.
6. Enable Secure HTTPS
- Ensure your website uses HTTPS encryption (SSL certificate). HTTPS is essential for protecting sensitive user information like credit card details during transactions.
7. Test the Integration
- Most payment gateways provide a “sandbox” environment for testing. This allows you to simulate transactions without involving real money, ensuring everything works properly before going live.
- Test for various scenarios like successful transactions, failed payments, and refunds.
8. Go Live
- Once you’ve thoroughly tested the integration in the sandbox environment, you can switch to live mode and start accepting payments.
- Ensure all notifications and emails are set up to inform both you and your customers of successful transactions.
9. Maintain PCI Compliance
- To securely handle payments, your website must adhere to PCI DSS (Payment Card Industry Data Security Standard). While using a third-party payment gateway helps, ensuring the rest of your site is PCI compliant is equally important for security.
10. Track and Monitor Transactions
- Set up a system to monitor and track payments via the gateway’s dashboard. Most payment gateways provide detailed analytics, allowing you to keep track of sales, refunds, and other transaction metrics.
Integrating payment gateways is essential for providing your customers with a seamless and secure payment experience. It not only boosts your credibility but also expands your business’s reach by offering flexible payment options.
If you need assistance with payment gateway integration or other website-related services, please visit Techstertech.com for professional web development solutions.